

Frequently asked questions regarding Adobe Photoshop including image re-sizing, cropping, resolution adjustments, nesting images, and the gamut warning.
This month I wanted to tackle the top questions we’ve received regarding Adobe Photoshop. This blog post will show you various tips for re-sizing your images, cropping, resolution adjustments, nesting images, and more.
The techniques described below will help you prepare your image files to print. Consider this your how to crop in Photoshop resource. All examples shown are done in Adobe Photoshop CS5.
1. Cropping an image to the correct size and resolution.
When working with different sized frames, sometimes it may be necessary to crop your file to fit properly. How to crop an image in Photoshop involves cutting out a part of the image that is not needed in the final print. For example: if I have an image that’s 24″ x 16″ but the frame I am using is 22″ x 16″, you have options. Here are 2 ways to go about cropping in Photoshop.
To crop an image to a specified location, select the Crop tool in Photoshop located on your Tools palette. It is important to keep the resolution of your image so there is no loss in file information.
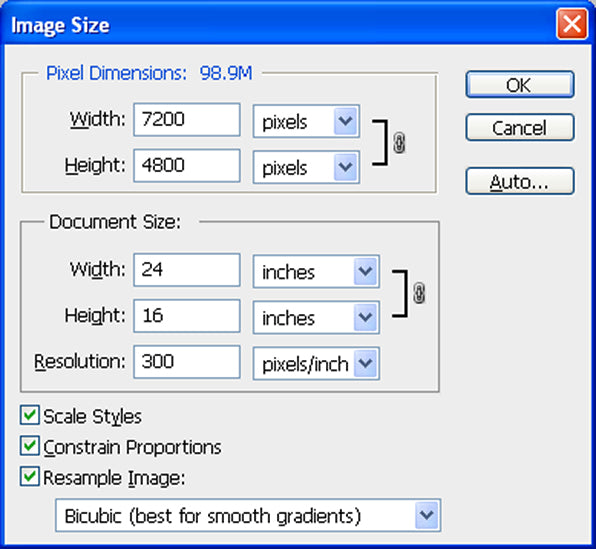
To keep the Photoshop printing resolution while cropping the image, you can view its image properties. Simply click on the Image pull-down menu and select Image Size. A new window will appear that shows you the size and resolution of your file.
Failing to note your file resolution may result in a Photoshop printing resolution error with the finished product.
Make note of the size and resolution (in this case our file is 300 dpi). It’s important to note this before moving onto the next step for cropping in Photoshop. Click OK to exit the window.
Go back to your Crop Tool options. These options are located above your image file, just below the pull-down menus.
Next, enter the size you need along with the resolution. You’ll notice at the top of your window you will have the Crop Tool options which includes the Width, Height, and Resolution. In this case, we want to crop the 24″ down to 22″.

After you have entered your pixel dimensions, click and drag the mouse over the image file. You should continue to drag until you have created the marquee crop selection. Now, adjust the location of the crop to best suite your needs.
When complete, hit Enter on the keyboard and the Crop will take affect. The purpose of cropping an image with the crop tool is precision. The tool enables you to place the crop exactly where you want it. See below for a visual example.

If you just need to crop your image to the center, you can quickly adjust the Canvas Size in Photoshop. The Canvas Size is the total size of your image file. However, you can add or crop from this size while retaining the original file resolution.
For example, if you need to crop 1″ on all sides of our 24″ x 16″ file (at 300 dpi), you would end up with 22″ x 14″ (remaining at 300 dpi). To do this, click on the Image pull-down menu and select Canvas Size.
Under New Size, enter 22″ for the Width and 14″ for the Height. This will crop 1 inch from all 4 sides of the file. The Anchor point shown in the same window indicates that the cropping in Photoshop will be done from all sides of the file.
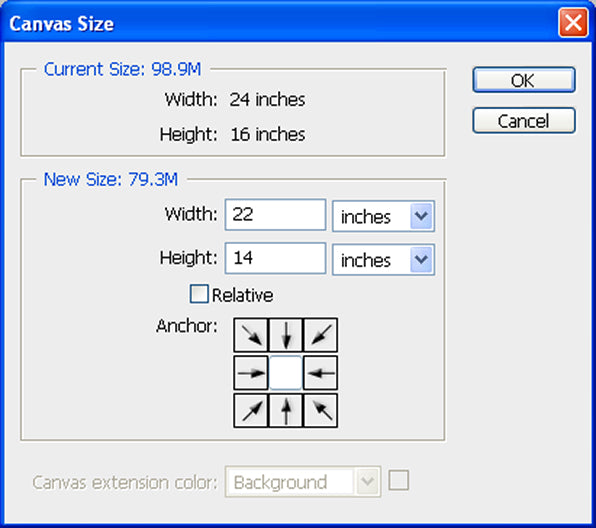
You can click on any one of the arrows and adjust the crop anchor. For example, if you click the middle-left arrow the image will be cropped from the Top, Bottom, and Right edges of the file. However, you’ll notice the left side will remain unaffected.
2. Re-sampling image resolution to achieve the best print quality.
Image resolution plays a key role in the quality of your prints. For most photo, fine art, and canvas prints a Photoshop printing resolution of 200-300 dpi will achieve the best results. An image that has a resolution higher then 300 dpi can be re-sampled to save disk space and aid in faster printing.
Let’s say we want to print an image file at half size. If we use the example above, half print size from a 24″ x 16″ would be 12″ x 8″. Go to Image Size (from the Image pull-down menu) and make sure that Resample Image is unchecked (FIGURE 1). Type in “12” in the Width column, and the Height should adjust to 8 inches.
The Photoshop printing resolution should show 600 dpi (FIGURE 2). This is because we still have the same amount of pixels in the file, but we don’t need to print at 600dpi.
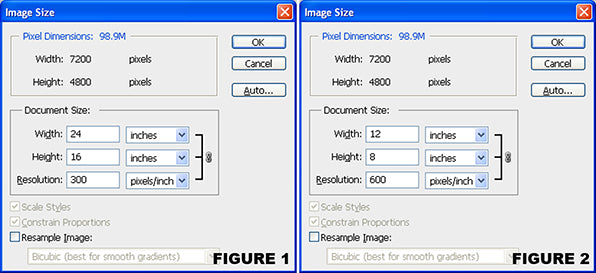
After you have entered 12 in the width (and the other values have changed), check Resample Image. You’ll notice that the Width and Height are locked but the Resolution is not. Enter 300 in the Resolution to change the resolution.
Under Resample Image, click on the pull-down menu and select Bicubic Sharper (best for reduction). This will sharpen the edges of the pixels being scaled to keep a sharp overall image. You’ll also notice that at the top of the window you can see the old and new file dimensions.

3. Sizing for Canvas Shrinkage.
Since we are on the topic of sizing images, let’s go over how to compensate for canvas shrinkage in a print. This is a critical step when learning how to crop in Photoshop, as it avoids a common amateur error when printing.
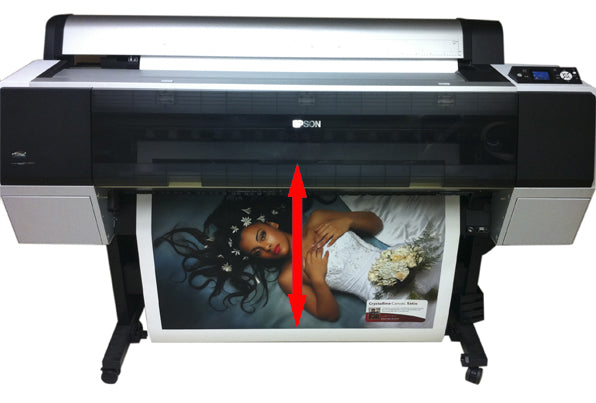
While there are several factors that can attribute to canvas prints coming out smaller then the size of the file, one stands out. This shrinkage is usually caused by tension created on the printer when feeding canvas rolls. This would explain why canvas sheets (either from a sheet box or cut manually from a roll) never have shrinking prints. It also explains why canvas prints off of a roll sometimes do experience shrinking prints in some cases.
If your print has shrunk vertically but not horizontally this is most likely the cause (See the photo below).
While canvas shrinkage may vary (or not happen at all), there is a quick and easy way to compensate. Measure the print that has shrunk, and make note of the amount of shrinkage. Go to the Image pull-down menu and select Image Size. Make sure Resample Image is checked, and UNCHECK Constrain Proportions.
You can now change the values for the document height without affecting the width. Let’s say the image shrank 1/8″, so instead of having a height of 16″ the print came out to 15.875″ (7/8″). Add the missing 1/8″ to the original 16″ height and click OK. Now when you print the image should come out to exactly 16″.

4. Nesting images without a RIP.
If you want to maximize production and cut down on waste, nesting images together is the easiest way to do so. Nesting images refers to printing multiple images at the same time. This can be done whether they are the same image or different images.
It is widely thought that a RIP program is the only solution to this. RIP stands for Raster Image Processor. With it, you can print multiple images across 1 or more printers. But with Photoshop you can accomplish this without the added investment.
Let’s say I want to print my original image and add a separate image to the side of it to print together. Open your 2nd image file, and adjust the Photoshop windows so you can see the 2 files side by side (As shown here). Both of these images are sized to 16″ x 8″ at 300 dpi. For this example, I want to nest them together to print side-by-side on a 36″ roll to conserve media.

On your 1st image, go to the Image pull down menu and select Canvas Size. Since both files are 16″ in width, we want width of our Canvas size to be at least 32″. If we include 1″ of space in between the images (for ease of cutting), our total width will be 33″. Type in 33″ in the Width, and below that click on the left middle arrow next to Anchor.

This will add the additional space TO THE RIGHT your image to make room for the 2nd image to appear.

Now, go to your 2nd image file and select the Move Tool. Click on the 2nd image and drag it to the 1st image. Now you have both images in 1 file and can print them together.

5. Soft-Proofing and using the Gamut Warning.
Soft-Proofing: Viewing your image on screen with a simulation of the output that will be achieved depending on the printer, the printer driver, and profile selected.
Gamut Warning: Shows the colors of a file that are out of gamut when outputting to a printer based on the ICC Profile/printer selected. This warning is intended to help you identify Photoshop printing in the wrong colors.
We have discussed printer profiling in a previous post. As such, this tip will not center on printer settings. If you need a refresher on printer profiling, we invite you to review that article again.
Instead, this guide will focus on soft-proofing your images and using the gamut warning. This tip assumes that you are working on a calibrated monitor. If you do not have a calibrated monitor or calibration device, check out the ColorMunki.
It is critical to soft-proof your file before printing. Without completing this step, you risk creating a Photoshop printing that is too dark and color innacurate. Printing output from photo printers and inkjet printers alike benefit from this step.
IMPORTANT NOTE: While the Gamut Warning will indicate which colors of a file will be shifted with an ICC profile, this is only an on-screen indication and doesn’t represent the final output. The Soft-Proofed image on your monitor shows a simulation of what will be output, but the absolute best way to compare papers and profiles is to physically print them out. While one file may show more colors shifting then another (with the gamut warning turned on), this is still not a clear indication of how the print results will be.
With your image open, go to the View pull-down Menu, scroll to Proof Setup and select Custom. Under Device to Simulate, select the printer profile you wish to use. In this example, we are printing on Lyve Canvas to the Epson 9900. Set the Rendering Intent to Perceptual, and check Black Point Compensation. Under the Display Options, check Simulate Paper Color. When completed, click OK.
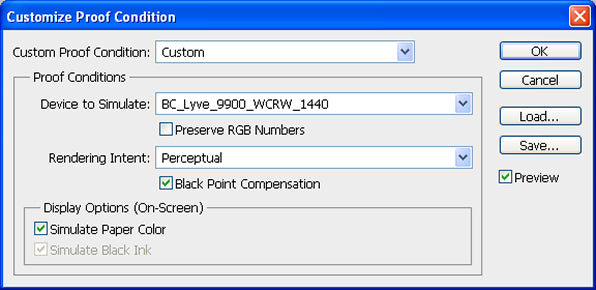
Your image will now be proofed to simulate the output with Lyve canvas on the Epson 9900

Now let’s see what colors in our file are out of gamut in the Lyve ICC profile for the 9900. Click on the View pull-down menu and select Gamut Warning. This will highlight any color values in your image file that may be out of the printable gamut of the Lyve ICC Profile for the 9900. These color values will appear as gray areas (as seen below). In this case, a very small amount of the brighter red areas of the flowers in the background are slightly out of gamut.

These colors will be shifted depending on your rendering intent when you print. You will not lose the color that is present in the file. The color values in the image file will remain unchanged, and the rendering intent will determine how these colors are shifted. The 2 most common rendering intents used are Perceptual and Relative Colormetric. Each of these rendering intents shift the colors in a different way:
Perceptual: Aims to preserve the visual relationship between colors so it’s perceived as natural to the human eye, even though the color values themselves may change.
Relative Colormetric: Compares the white of the source color space to that of the destination color space and shifts all colors accordingly. Out of gamut colors are shifted to the closest reproducible color in the destination color space (ICC Profile/Printer combination).
If the out-of-gamut colors exceed more then 10% of the total file, you may want to consider a color adjustment/correction to your file. In most cases, if there are any out of gamut colors it will be very minimal.
That’s it for this month. Have any tips to add to what was shown here? Post them below!
