

Ever sent a job to print, only to have to rush to cancel it because of lines going across the print, ruining the image?
These lines, which are typically left in the direction of printhead travel, are referred to as horizontal banding.
It’s a fairly common problem, and one that many people don’t immediately have a solution to. We thought it time to write a quick post to assist in solving that dilemma.
What Does Banding Look Like?
The novice printmaker may not have a specific name for the issue. I’ve heard: bands, banding, horizontal banding, weird white lines in my print, and many more.
They might look like pinstripes on a shirt, or the flickering of an old CRT monitor. Whatever name you give them, these lines are not welcome on your print!
Check these out. Don’t be frightened, they’re only examples. Your printer is OK.

Banding Example 1

Banding Example #2

Banding Example 3
How to Fix Horizontal Banding
Here is a personal checklist that I run through if I start to see banding on my own prints (god forbid!) or if I’m lending a hand to someone else in need.
1) Run a nozzle check – Nozzle checks can really tell a story! Look at it closely.
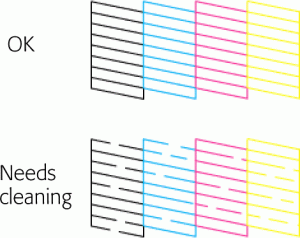
What to look for in a nozzle check
2) If you see line breaks in the nozzle check, run a head cleaning cycle.
Technical Note: I like to use a loupe (search amazon if you need one) to check for small image-loupebreaks in the lines. I also like to do this on a smooth paper, rather than something like canvas, so I can accurately assess the test print. Often times, if a nozzle check looks perfect, that is a fair indication that you may want to look at your print settings rather than continuing to investigate on the hardware side of things.
3) If all lines are solid, determine how long it’s been since a printhead alignment has been performed. Depending on printer usage, I typically run a printhead alignment every 6-12 months. If you’re outside this window, I suggest that be your next step.
Technical Note: If your printer has multiple “levels of intensity” options available for this, take into account how many breaks you see thus how bad the clogging may be. The higher level of head clean you perform, the more ink you are spitting out (wasting) in attempt to clear the clog.
4) Do a small test print to determine if the horizontal banding is still present.
In your print settings, be sure you are: using the correct ICC profile and proper media type setting. Other than a clogged printhead nozzle or misaligned printhead, an incorrect media type setting is commonly the next item in the list of causes for banding.
Technical Note: Within your printer driver comes a set of media types (Watercolor Paper Radiant White, Canvas Matte, Premium Glossy Photo Paper, etc) which contain a lot of information and specifications as to what the printer should do. Amongst these pre-defined settings are things like ink limits, paper feed adjustment, platen gap/head height, and paper thickness. You’ll want to make sure you’re selecting the proper media type setting for the paper or canvas you are printing on, because if one or more of these settings is far from what it should be, banding (or other print-related issues) can arise.
What We Learned
While banding can be caused by a whole host of various things – software and hardware related alike – this problem can often be solved using the above checklist.
Hey, I have read your article and I’m still stuck!
No worries.
Drop a photo of the problem in the comments below and we’ll help you out with getting to the bottom of it!
