

Step-by-step instructions on how to define your own custom paper sizes in Photoshop, regardless of which printers you have.
So you are using an Epson 3800, 3880, or nearly any other 13″ or 17″ wide sheet-fed Epson printer. If you are having trouble creating a user defined paper size, we will show you how here.
Prep
Before we get started, make sure you’ve done the following:
-
Clear any paper from the manual feed tray on your Epson 3880.
-
Make sure your printer’s Epson software has been fully updated by checking the Epson.com website.
-
If any software/print drivers are out-dated, install the updates.
Setting A User Defined Paper Size
You can define your own custom paper sizes in Photoshop, regardless of which printers you have. You can create & manage a list of custom paper sizes through Photoshop’s “File” > “Print” > “Paper Size” dialog. Here’s how to get started:
Step 1 – File > Print

Make sure you’re all set with Photoshop managing colors and the proper ICC profile for the media you’ll be using.
Then click “Print Settings.”
Step 2 – Select Paper Size Dropdown Menu

Make sure you have “Epson 3880” selected for “Printer,” and leave the “Presets” to “Default Settings.”
Select the “Paper Size” dropdown menu and you’ll see a huge list of preset paper sizes.
Step 3 – Select “Manage Custom Sizes…” at the bottom of the list.
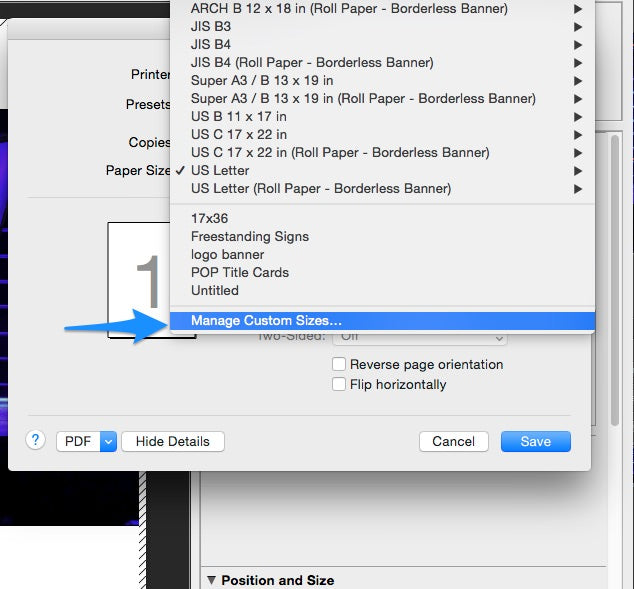
At the very bottom of the dropdown list, you should see “Manage Custom Sizes…” – you may need to scroll down in the dropdown menu if you’re not at the bottom of the list.
Step 4 – Creating Your Custom Paper

Once the “Manage Custom Sizes…” window opens up, you’ll see a list of custom papers you’ve made on the left. It may be blank if a custom paper has never been created.
Click the “+” sign to create a new paper size and name it. We named our example “Robert’s Paper Size.”
Step 5 – Now you’re ready to set the paper size & margins

Once you’ve named your custom paper on the left, fill out the width, height, and margins for your paper.
I usually set the margins to 0 in case I want to use this paper type for borderless printing at any time.
Click “OK” once you’re done.
Step 6 – You’re ready to print with your new paper size!

Once you click “OK”, you’ll be back to the standard print dialogue. Go back to “Paper Size” and your new custom paper will be listed at the bottom, ready to select for your prints.
