

How to use the Puppet Warp tool in Photoshop – step by step instructions on realistically altering the positions of objects in images.
Photoshop offers several options for distorting images. One of the most sophisticated is Puppet Warp and it’s very easy to use.
I believe it’s named Puppet Warp because when it is used on objects, one can move selected sections much like a puppet.
Many retouching artists find it helpful for refining body postures and it’s also a good choice for working with buildings and landscapes. It’s a popular choice for many styles of imagery.
More from our Popular Tools in Photoshop series:
- How to Create a Custom Pattern
- Spot Healing Brush Tool
- Healing Brush Tool
- Clone Stamp Tool
- Dodge and Burn
- Brush Tool Basics
- How to Create a Custom Brush
Where is the puppet warp tool?
Puppet Warp is located in the Main Menu Bar under Edit / Puppet Warp.

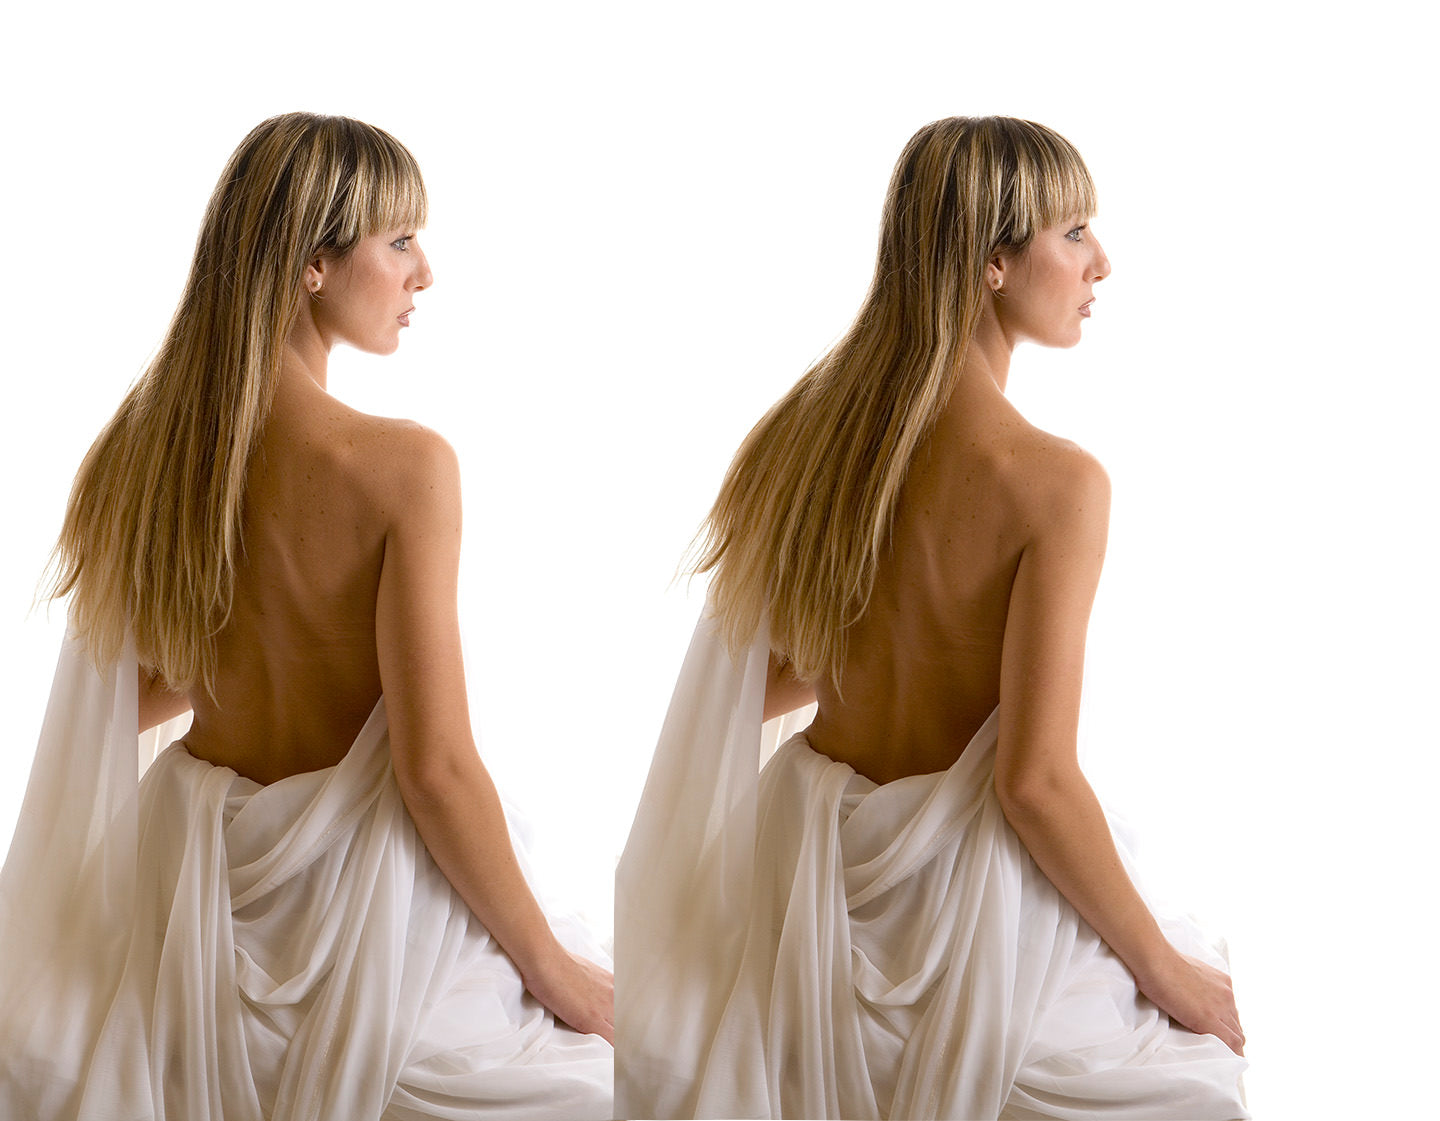
We’ll walk through the options in Puppet Warp while working on this image by Maz Mashru of Leicester UK.
The goal will be to lean the body forward to create a less static posture.
Hope that helps some of you out that would like to return to this guide later or print it out!

Creating distortions with puppet warp
The first step is to duplicate the Background.
When using distortion tools, the entire image is affected unless you separate the area you wish to distort from the rest of the image.
I suggest creating a loose selection around the subject using the Lasso Tool and then applying a layer mask.
Be careful not to create too tight a selection or the subject may “bump into” the edge of the mask, flattening it somewhat.

View the entire image on screen. Draw the selection using the Lasso Tool.
Add the layer mask by clicking on the Layer Mask icon at the bottom of the Layers Window – it looks like a square with a circle in the middle of it.
The Layer thumbnail should show the body in white and the background in black.
If this is not the case for you, use the keyboard shortcut, Command (Control) I to invert the mask, or choose Image / Adjustments / Invert from the Main Menu Bar.

Next, open Puppet Warp. Edit / Puppet Warp.
There are options for Puppet Warp that affect how it works.
First, there is a choice for Mode.
Your choice of Normal, Rigid or Distort tells Photoshop how elastic you would like the distortion to be between Pins.
This translates into curvature between Pins (or adjustment points).
When working with people, Rigid is a good choice because Pins are generally placed upon natural joints and it’s not desirable for bones to bend between them.
For instance when raising a forearm from the elbow by the wrist one prefers the forearm to move rigidly, not bend between the elbow and wrist.

Next is the density of the warping mesh.
Normal is default but there are options for choosing to work with Fewer Points or More Points.
The density of the mesh affects how close adjustment pins may be placed to each other.
More Points might be chosen when working on detailed areas, like fingers.

Expansion options allow you to expand the mesh beyond the subject so you can place pins off the subject if need be.
Our pre-selection is already loose, so there is no need to expand the mesh in this instance. The default setting of 2 pixels is fine.

The next option allows you to show or hide the Mesh.
Puppet Warp opens the first time with the Mesh showing. After, it opens in whatever choice was previously used.
It is a good idea to show the Mesh initially to verify that it is a good size for the job, but it’s visually more pleasant to work with it hidden.
For this reason many users uncheck the box while working.

Pin Depth is helpful if your intention is to cross one part of the image over another.
For example if you cross one leg over the other you can choose which leg you prefer to be on top.
Just click on the Up or Down option and the active Pin will respond accordingly.

Rotate allows you to set a particular rotation around pins, either automatically (Auto) or (Fixed) at an angle of your choosing.

The last three options allow you to Clear All Pins (and start over), Cancel Puppet Warp or Commit Puppet Warp (also committed by the return or enter key on the keyboard).

Puppet Warp will be used on this subject to lean her body forward slightly, drop the front shoulder, bend the front elbow back a little bit and lift her head.
To begin, a Pin will be placed at the end of her tailbone just by clicking on the image. Notice that the Mesh has been turned off.

Next, the bottom of the image is locked in place by adding a few more pins.

It is a good time to mention that the active Pin displays a tiny white dot in the center.
Active Pins are the only Pins that will move when dragged. The other pins act as locks.
Multiple pins may be selected and moved together as a group by selecting one and then Shift clicking on the others to add them.
A Pin may be deleted by selecting it and hitting the Delete key – or by holding down the Option or Alt key and clicking on it.
For the first move, a Pin has been placed on the nape of her neck and drug over to the right.
Notice that the body moved, including the head. The head is now looking downward.

More pins were placed and moved individually on the shoulder, elbow and crown of the head.
The shoulder was dropped slightly, the elbow was moved back and the head was lifted.

The Return (enter) key commits the change.

There is usually a little bit of cleanup to do.
In this instance a New Layer was created between the Background and the Background copy and the Brush Tool was used to paint white paint over the remnants of the original image.
The Clone Stamp could also have been used for the cleanup.

Complicated backgrounds might require additional retouching here and there.
The Layer Mask does not allow full usage after Puppet Warp; it can be hidden to refine edges closer to the subject, but will not expand very far beyond the original selection.
Just use standard retouching tools like the Brush, the Clone Stamp or small selections as needed to make the image perfect.
Closing Thoughts
People buy images of themselves based upon how their body looks and what their expression is.
Puppet Warp offers powerful ways of re-positioning body parts to look their very best.
In addition, as in this project, Puppet Warp can be used to add a sense of movement, bringing more feeling into an otherwise static pose.
AND Puppet Warp can be used to create imaginative imagery far beyond what a camera is capable of capturing.
Please explore Puppet Warp and see where your imagination takes you!


Jane Conner-ziser is an award winning photographer, digital artist, premier educator and independent consultant. With over 25 years of experience, 19 of them in digital imaging and evolving technologies, the techniques Jane developed for facial retouching and enhancement and portrait painting from photographs are widely emulated by photographers and digital artists worldwide through her classes, online training and educational products.
