

Guidelines for tastefully retouching portraits, tutorials to soften or remove blemishes and undesired features, and some general tips on when and when not to retouch.
This truism is rarely more evident than when you see an over-retouched portrait, changing a face to something more resembling a Ken or Barbie doll than a living human being.
This post looks at fundamental techniques for retouching portraits that enhance an image, not distort nor disguise it. It shows all the steps, using a well-aged face that benefits from retouching attention more than most.
Why Retouch At All?

Some purists will argue that a portrait should never be altered, at all.
It should never deviate from the original capture. Others, as exemplified by the plastic-skinned images displayed on some magazine covers, think that radical alteration is essential. I would propose that different types of images require different approaches to retouching.
Let’s start with a basic portrait of a real person, not a film star.
Modern Lenses are Too Sharp
It’s a portrait, not a clinical dermatology record.
When you create a portrait of someone today, every flaw, every skin defect, every imperfection can be recorded in excruciating detail. Is this what we see when we look at the person’s face? No. Human eyes are searching much more for emotion, expression and character shown in the eyes and expression than for the skin flaws.
This leads to O’Connor’s Rule of Retouching:
A retouched photo should look like the person in your mind’s eye when you think of them, neither more nor less.

The man in the portrait above has a series of skin flaws most people wouldn’t notice so intently if they were to look at him face to face, or remember if they spoke on the phone the day after they met. The clogged pores, enlarged pores, small broken veins, splotchy spots all over his scalp, fifty-five-year-old chicken pox scars on his forehead and the general wear and tear that comes with age are all shown in painful detail when photographed with a contemporary lens. In this case, a Nikon 105 Micro lens added even more clarity to the image—and clearly, more clarity than was needed!
How to Retouch and Remove Some Things Entirely
Using this face as an example, let’s look at what we would do.

My preferred approach is always to retouch, as much as possible, in a non-destructive fashion, so I can always undo, soften or otherwise modify the retouching. To do this, I do most of my retouching on different layers above the original image. To speed up the work, I’ve created Actions in Photoshop that create new, pre-named layers in one or two mouse clicks.
In this case, I’m going to mark (on a markup layer) the things that I will remove entirely (circled in Red)…

…and the things I will soften (circled in green).

All of this will be done on separate layers so that I can erase and redo the retouching if I decide to change it later.
- Create a new layer. Name it “Remove Entirely.” It’s important to name each layer as you add it, so that in a multi-layer file you will be able to identify and select a layer easily. (An action which creates and names a new layer with this name with one mouse click is available to download at the end of this article.) Once created, be sure this layer is selected and move to the next step.
- Switch to the Healing tool (Cmd/Ctrl J) (or build the switching into the Action).
- The Healing tool has 4 different modes; be sure you start with the Spot mode, which is the top choice in the fly-out when you click on the Healing Tool.
- Remove things that are temporary. Blemishes, blackheads, whiteheads, scabs, touches of food in teeth (it happens more often than you’d think), flaky skin—anything that’s not permanent should be entirely removed. You can even remove hairs flying off at odd angles to give this man the trimmed beard, shave and haircut he should have had before making this photo.
- If you make a mistake, switch to the eraser tool, and erase your retouching on the layer above your original image. Because your work is all on a separate layer, you can easily erase it to do it again the way you want it. Non-destructive editing is a great way to start mastering retouching, as it can give you additional confidence to try different approaches.
- Review the images to make sure all the items you want to remove entirely are entirely gone. Now, on to softening instead of removing certain other items.
How to Soften (Not Remove) Other Things

Some parts of facial retouching should be done to soften the impact of certain elements, especially when removing them would make the subject look silly.
An eighty year old man with a face as smooth as a baby’s may have entertainment value but certainly isn’t a professional standard.
How much is enough? Perhaps it’s time to revisit O’Connor’s Rule for Retouching:
Cameras see faces differently than human eyes see faces. Therefore, make your digital file look like what your eyes saw when you created the image. When in doubt, err on the side of charity.
What should we soften? Lines, pores, shadows under eyes, other skin flaws that the camera magnifies—soften everything so that these items appear more like what we saw when we photographed the subject. Most of the time, these are intensified in an unadjusted image, more than we noticed with our eyes. Few people will thank you for making them look even older than they already appear!
How much should these items be softened? This depends on the items in question. In the sample photo, I’ve circled in green all the items that will be softened, but not removed entirely.
The deep shadowed wrinkles, bags and discoloring under the eyes, as well as the deep set lines above the eyes can’t be removed entirely, or the person would look silly, as shown in the next photo. The deep-set lines in the neck, the stubble, and the stray hairs going off the head that needed a shave and a haircut-—all these items need to be softened and toned done, so the subject looks less sepulchral.
Steps to Soften Certain Features
- Create a new layer, named “Soften”.
- With the Soften layer selected, switch to the Healing Brush. Then, quickly remove all the items listed such as the ones circled in the previous photo.
- Now, why would I remove all this, when I said I was simply going to soften it? Turns out it’s actually quicker to use a separate layer to remove all this very speedily using the healing brush, then dial down the opacity. An added advantage is that you don’t need to be as precise, because you’re going to be blending the two layers together.
- With the Soften layer selected in the Layers pane, click on Opacity above it. Change the opacity from the 100% default, while viewing the image at the largest size you plan to use it. Move the slider left and right to see where you like the effect best.
Let’s take a look at the results. First, with the Soften layer at 100%.

This is an example of how retouching can look when too much is done. This isn’t the natural look we’re going for. Instead, let’s pull the softness down to 55%.

Much better. This gives us a more realistic view of the retouched face. He looks better, and he doesn’t look plastic.
The percentage opacity can be set anywhere from 0-100%, so it’s a great way to dial in the amount of retouching to suit your taste and/or your subject’s preferences.
When Different Parts of the Face Need Different Amounts of Softening
Sometimes parts of the face need different amounts of retouching. If you realize this before you start, you can create multiple Soften layers, named for each different area, each with its own opacity.
If you didn’t realize that you needed different opacities before you put all your softening retouching on one layer, you can duplicate the layer by dragging it onto the New Layer button at the bottom right of the Layers pane. Then, rename it to indicate what area it is, and erase the retouching on the original Soften layer for the areas you want to change opacity.
The eye on the left in this image might benefit from a more opaque layer lightening the shadow under the eye, though this should also be judged with the entire image, not just the zoomed in window shown. If so, a quick duplication of the layer, a selection of everything except the retouching under this eye to be deleted, and an adjust of opacity is a matter of seconds, not minutes, to fine-tune this part of the retouching.
Retouching Whiskers, Beards, and Stray Hairs

If your subject shows up unshaven, or needing a haircut, you might think it’s going to be a lot of work to get him looking good. It’s surprisingly easy to retouch much of this in a hurry.
For stray hairs, to remove them, I use the healing brush in Spot mode at a small brush size and brush over them. You may find you have a small problem blurring at the area where the hair comes out of the head; if so, switch to the Clone Stamp tool to finish removing the individual strands of hair. Using the healing brush on curiously-angled hairs usually blends them quickly, no muss, no fuss.
 Before.
For stubble, I could retouch each whisker individually to give him a clean shave, but a much quicker way to do this is to use the Dust and Scratches filter to clean up the mess. To do this, select the top layer. Then, using an undocumented tip in Photoshop, hold down the Option/Alt key and in the fly-out menu of the Layers palette, select Merge Visible. Adding the Option/Alt key while selecting Merge Visible creates a new layer of all the layers below. Name this layer Skin Smoothing.

After.
Next, select the Patch tool under the Healing Brush options. The Patch tool won’t operate on a layer above an image layer, but must work directly on a copy of the image. This is why I made a composite layer. On that layer, use the Lasso tool to select the skin areas that have stubble on it. Next, under the Filter menu, select Noise, then Dust and Scratches. The areas selected with the Lasso tool will smooth out, varying with the selections of Radius and Threshold. When you click OK, save the results. If it appears too much, I can always dial down the Opacity. This same technique can be used to soften the freckling on the top of the man’s head.
Complexion Adjustment
This man is too ruddy, brought out even more by the light used to photograph him. It needs to be toned down a bit.

A quick way to diminish florid complexions is to be sure the top layer in the palette is selected, then create an Adjustment layer by clicking on the half black/half white icon at the bottom of the Layers palette. Select the Hue/Saturation option, and in the Properties dialog, select the second pull-down menu, changing Master to Red. Next, move the Saturation slider to the left, diminishing the red in the skin until it’s just right.
Special Considerations
Some characteristics on certain faces are tempting to remove entirely. Examples of this include birth marks and moles, as well as scars. You do this at your peril if you don’t discuss it with your subject first.
I made this mistake early in my career, when an elderly relative insisted I start over and leave the moles on her face, because, even though they were large, and distracting, they were a part of how she looked, and she didn’t want them to disappear in her portraits. When I redid the retouching, I left the moles, but softened them enough so that they didn’t stand out more than when I saw the relative in person.
Some skin flaws will be stand out much more than they appear to the human eye when photographed and must be dialed down.
Retouching Hands
In some ways, hands are better indicators of age than faces.
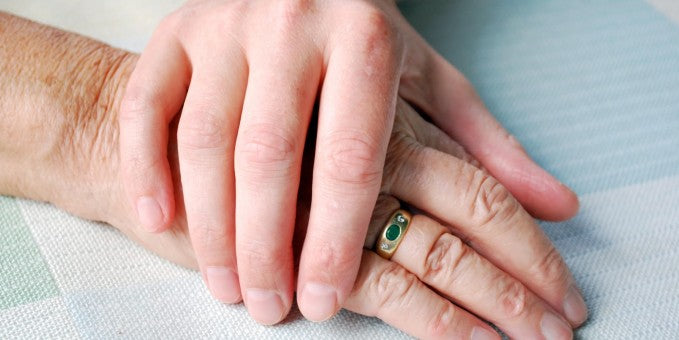
It’s important to retouch hands to match what you’ve done on a face, softening or smoothing lines and age spots to a similar degree, while removing temporary blemishes such as bruised knuckles. An important item to note is that often hands are lighter-colored than faces, though we don’t usually notice this until both are side by side in a portrait image.
This is important, because viewers’ eyes are drawn to the lightest areas of a photo first, and in a shot where hands are near faces, often, hands fight with eyes for the viewers’ attention. To remedy this, you can subtly darken hands to diminish their brightness.
Conclusion
When preparing to retouch, discretion and discernment are key for each image. To build a perfectly retouched image, use the steps and techniques shown in this blog post.

Analyze each image, asking:
- What should be removed entirely?
- What should be softened?
- What should be reshaped, or changed?
- What special requests does the subject have?
- What sensitive items should be discussed with the client before retouching?
- How sharp should the final image be?
Don’t be afraid to experiment, erasing on the retouching layers, or changing opacities. Use these steps to create the perfect portrait.

Kevin O’Connor helps design and test software, is a graphic designer and photographer for multiple clients and companies, and fixes people’s (and companies’) color.
He has consulted to multiple companies, including Apple, Sony, Fujifilm USA, and X-Rite. He loves teaching good color practices to enthusiastic learners.
Have a Printmaking Question For Kevin?
Get Your Question Featured
on the #AskBC Podcast
We are going to feature Kevin on an upcoming episode of the podcast and would love to have him answer your printmaking questions.
If you have a question for Kevin just click the button below and leave a question.
