

Panoramic photography tips – shooting perfect panoramas with your phone by using the right tools, software, and techniques.
Capturing ultra-wide panoramas is a great technique to mix up your photography skill-set and create larger-than-life work that captures landscapes and architectural features in a unique way.
You may think you’d need specialized equipment to shoot a panorama, but in this blog post we’re going to be demonstrating the basics of panorama photography using a tool you likely already own: a smartphone.
The Original Panoramic Photographs
Panoramas have been around since the invention of photography.
The word panorama usually refers to photos that are extremely wide, relative to their height, or vice-versa.
This format forces us to see differently, to compose differently, and once we’re awakened to the possibilities inherent in this format, we become better photographers for the challenge of seeing in new ways.

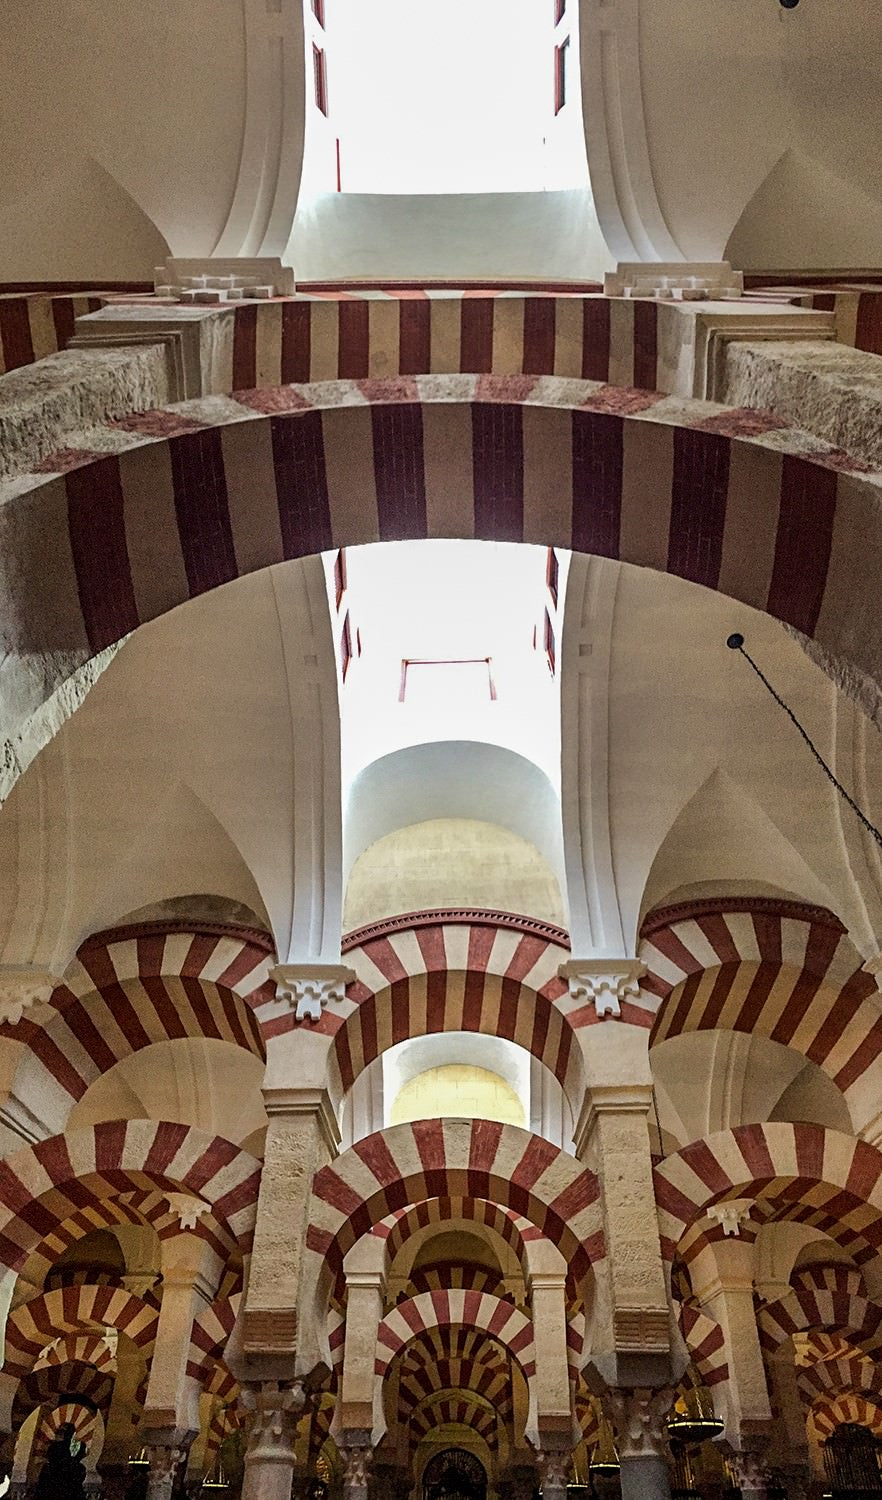
Such as, a panorama that sweeps from one side of the Mosque–Cathedral of Córdoba up into the air, over the arch and down to the base of the other side’s wall.
Or another, that starts out capturing the wall in front of you, but continues up to include what’s directly overhead, as shown below.
Some of the earliest uses of photographs were for landscapes, and frequently, photographers’ desire to focus attention on the landscape meant they would crop a large amount of the sky out of the image.
(At that time, most photographers were making their own sensitized paper, so the cropping may also have been motivated by desire to keep paper sizes as manageable as possible!)
Standardized print sizes came much later.
Images that are fairly short, relative to their width, show up early and often in the history of photography.
As roll film cameras became popular, specialized panoramic cameras were created, many using a film format of 6 x 17 cm, or 2.25 x 6.75 inches.
This format uses standard 120/220 medium format film rolls. Other photographers created panoramas using view cameras, sheet film, or panoramic backs using roll film.

original image a silver gelatin print, 10×47 inches
A third panoramic camera approach, called the Cirkut camera, was patented in 1904.
It could produce an image that covered up to 360°, using a variety of film sizes, from 5–16 inches in height and up to 20 feet long.
The camera and the film rotated at the same time on a specially designed tripod.
You can see in the image above how the rotating camera creates the curved appearance of items that are actually straight.
This effect, shown in this old photo from the Library of Congress, is duplicated when using a contemporary camera phone to create a panoramic image, as shown below, with a straight path that curves in a U shape in this image.

In the studio, we recently received a very old negative, created with a Cirkut-style camera, 11 inches high by 66 inches wide, to be scanned, printed and mounted.
Many panorama negatives are so large that labs are not able to print them using enlargers.
Instead, they place the negative directly over a sheet of photo paper under a sheet of glass, exposing the sandwich to light on a timer, to make a contact print.
This method delivers an unparalleled degree of sharpness in printing, assuming the original negative was captured correctly for maximum sharpness.
As soon as scanners were invented and could scan negatives, they were harnessed for panorama printing. Some panorama shooters still use this hybrid approach.
They shoot their favorite film and camera combination, then process the film and scan it for printing.
The cameras that create these negatives use special lenses designed to cover an extremely wide field of view.
Examples of these cameras include the Hasselblad XPan, the Linhof Technorama 617s III Panoramic, and the Fuji G617, which is shown here.

While these negatives and transparencies can be challenging to print, the large film format delivers very large prints that look extremely good on the wall.
Even Bigger Film Is Still Used, As Well as Digital
While the majority of contemporary panoramic photography is created using digital tools, some contemporary ultra large format photographers shoot giant-sized pieces of film.
These sizes are diverse, including 4×10 inch, 8×20 inch, and 20×24, to name a few.
As you can imagine, each piece of film is very expensive (each 20×24 sheet costs more than $50), and requires careful, methodical handling, in exposing, developing, and printing.
Most of us won’t ever shoot images this way, but it’s fun to know other people’s approaches to their work.

Digital Panorama Creation; Multiple Options
Contemporary panorama photography created with digital tools allows us to shoot any ratio of height to width we would like, crop as desired, and print any size we’d like.
The widespread adoption of smartphones means many of us have a really good panorama camera in our pockets, with us at all times.
Let’s look at the choices available today, considering both advantages and disadvantages

You can choose:
- Contemporary smartphones, hand held
- Smartphones using specialized bases and supports
- Digital cameras, regardless of model
- Specialized digital panorama tools
- Automated panorama heads for tripods
- Seitz 6×17 Digital Panoramic Camera
This blog post looks at what you can do with your smartphone, the easiest entrée into the marvelous world of panoramas.
A future article will discuss using standalone cameras of various sorts, and specialized software.

Smartphones: Using the Tool Most of Us Already Own
Great panoramic images can be created with the tool almost everyone has–smartphones.
Very good cameras and software are included with contemporary phones, set to go right away.
Additional capabilities are easily added through various applications available for both iPhones and Android devices.
In this blog post, I’ve added several great images captured by photographer Scott Saier, who took only his iPhone for a multi-country European tour.
Among the 3,000 images that he created, he photographed some spectacular panorama shots, which I’ve included in this article.
I’ve also included some work by photographer William Faulkner to give you some ideas for how to shoot your own panoramas by seeing how three other photographers shoot theirs.


Advantages:
- We almost always have them with us. So if we’re inspired to capture a beautiful panorama, we can do so instantly.
- The built-in software is designed to make creating panoramas as easy as possible.
- Additional apps for extended capabilities are easy to get.
- The files are quickly transferred to a computer or uploaded for editing, enhancing and printing.
- The files are so large and of such high quality that they will make beautiful prints. For example, the camera in the two newest iPhones (6s and 5SE) can produce a panorama up to 63 megapixels. This can create a print 200 pixels per inch at approximately 12.5 inches by 41 inches, enough for a great print on an inkjet printer.

Disadvantages:
- Most phones’ camera lenses don’t stay as clean as they should be, traveling in people’s pockets. This leads to degraded image quality. The smaller the lens, the more image degradation happens with a single speck of dust or smear on it, and these are very small lenses.
- It can be hard to hold a camera perfectly level to capture a panorama in a straight line. The more the phone moves up and down, the more the image will have to be cropped (or, sometimes, patched), limiting the vertical aspect of the final image.
- Unsteady hands will introduce camera shake when using cameras without built-in optical stabilization.
- Some standard phone software products have limitations as to the number of degrees you can capture in the panorama, topping out between 180-240°.
- The files created are so large that they cannot be directly e-mailed at full resolution using many e-mail accounts.
- Lack of lens hoods means that strong light sources can sometimes cause flare in parts of the panorama as you rotate the camera. Using a hand or a broad-brimmed hat is only a partial solution, often unsatisfactory.
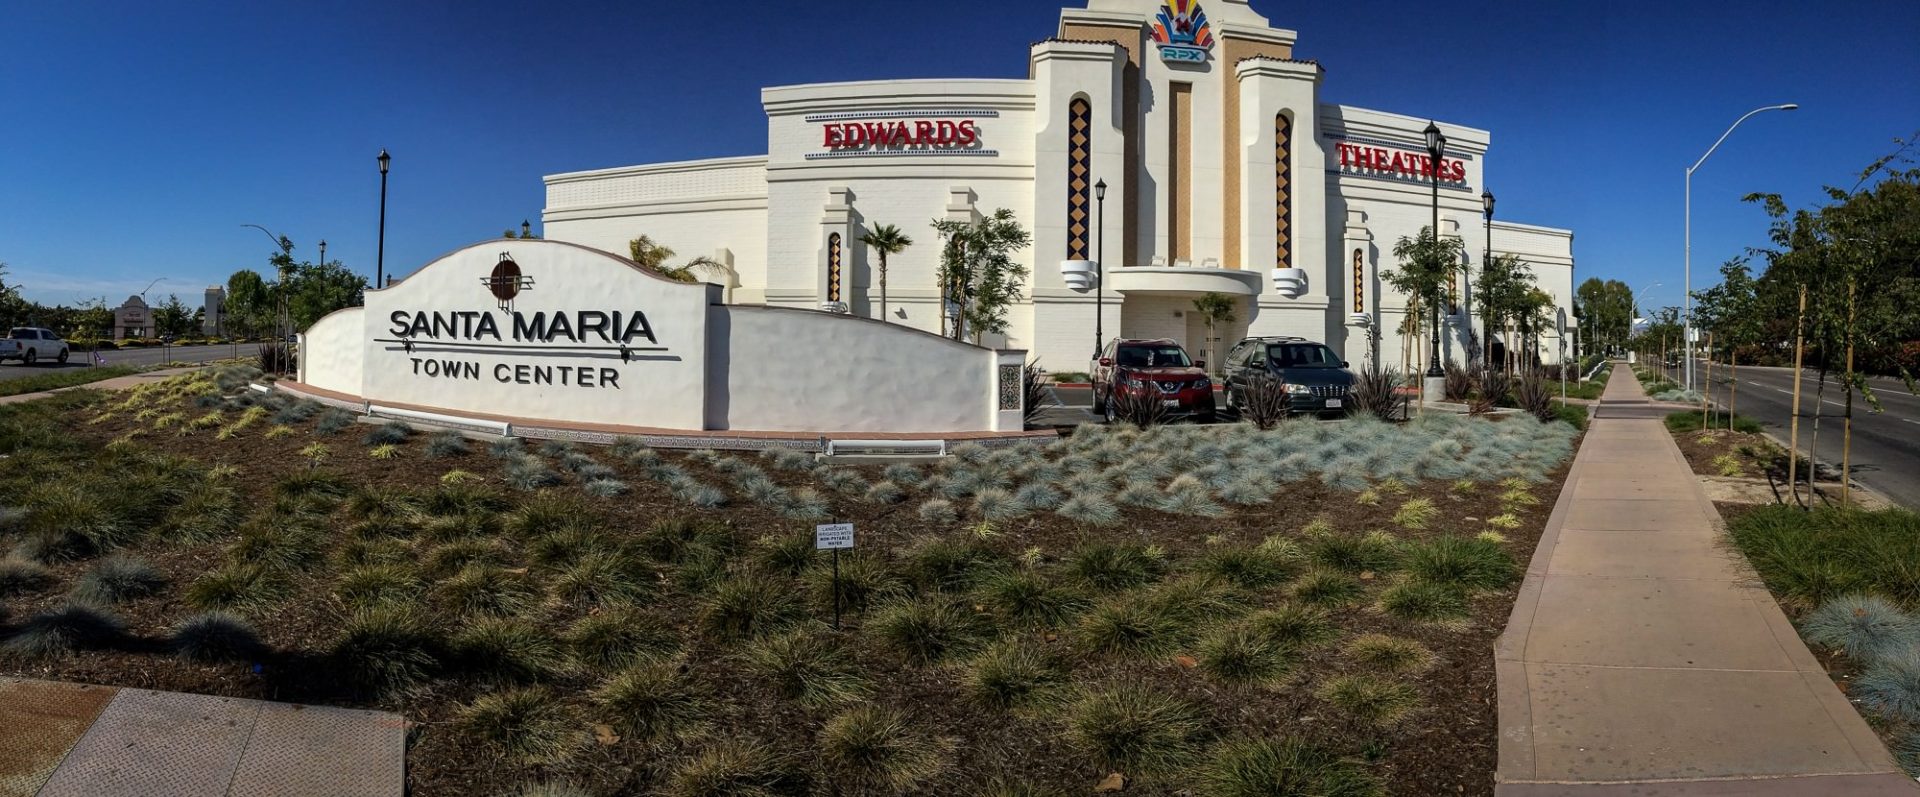
- It can be difficult to frame a panorama so that all of the included scene is part of a good composition, as shown below.
In this shot of the Santa Maria Town Center below, the area at bottom left in the foreground is not particularly interesting.
However, an image with room for a block of text over the foreground or other areas will find a home in wide magazine layouts and other print/photo combinations.
Getting even further back to include the top of the building would include more of the unattractive foreground—making a great argument for cropping, no?
A Fun Change for a New Perspective: Vertical Panos
Many people never try changing their perspective when shooting panoramas, but shooting vertical or overhead panoramic images can be very rewarding, and occasionally very entertaining.
Imagine the looks you’ll get from other people seeing you waving your arm in the air while shooting—and the smiles you’ll make when you create cool images like the ones below.


The Freedom to Crop
You’ll have noticed many of the images in this article are cropped to different ratios.
When you create a panorama using your phone, you can stop shortly after starting, or go the full width your software allows, to precisely create the image you envision.
Panoramic photos are not required to be constrained to a specific ratio, so cropping can also be done later as needed.
For a good overview of the Art of Cropping, a critical skill for good photography, see the article here on Breathing Color’s blog.
Adding Third Party Software
As you’d expect, many applications are available to extend the photo capabilities of your phone, including a surprising number for panoramas.
A quick check on the iTunes store shows a hundred app icons, offering choices between free, pay once, or pay in-app for various capabilities.
Some capabilities you might want to add allow you to capture multiple single images and stitch those images together into one large image after shooting.

The reasons you might want to capture a panorama this way can include:
- Using a different algorithm to stitch differently, which can result in smoother or less-distorted results for some subjects.
- Wanting to capture a panoramic image that reaches higher and lower than the camera software, up to and including a 360° image in all directions, not just horizontally.
- Wanting to use HDR (high dynamic range) capture, something not all current phones will let you do with built-in software.
There are too many phone software choices to discuss, so let me encourage you to poke around your iTunes or Android store, searching for “panorama” or “panoramic” to read the reviews and capabilities to find the ones that best meet your needs.
Better Support for Cellphones when Shooting Panoramas
A cellphone supported on a steady base can create an even better panorama.
Various devices are available that either rotate your phone for you, or allow you to turn your phone manually.
One clever designer has created an app called Cycloramic, using the phone’s vibration motor to rotate the camera.
Originally designed for the iPhone 5/5S, the software requires the iPhone 5/5s to stand on end, and when triggered (which can be done by clapping your hands), the camera starts to spin on the table or other base to create a 360° panorama.

When the iPhone 6 appeared, with rounded edges, the phone could not stand straight up.
Cycloramic designed a creative solution, using the small cube-shaped charger that comes with the iPhone.
The photographer simply wedges the phone between the two prongs of the charger, which is placed prongs-up.
The software uses the camera’s vibration motor to capture up to 360° in a full panorama.
For $1.99, this is a fun tool to try out with your iPhone 5, 5s, 5SE, 6 and 6s, and certain Android phones.
It does not work with the iPhone 6 Plus and 6s Plus models.
Advantages:
- You already own the charger; it came with your phone.
- The software is very inexpensive ($1.99 at this writing).
- A full 360° single row fpanorama can be created.
- The quality of the images is very good; the camera rotates in a perfectly straight line, supported on a flat surface as it rotates.
Disadvantages:
- You’ll have to carry the small charger with you.
- The camera and charger must be used on a smooth, polished surface to rotate correctly. Texture impedes rotation!
- It only works with certain phone models, both Apple and Android.
- If you have a thick case on your phone, it may not fit in the prongs of the charger to rotate.
- You may not want the table surface in the photo, especially if it’s a very broad table. Factor this into your composing.

Automated Rotating Panorama Bases for Phones
A wide range of special bases designed for panoramic photography is available for cellphones.
Some include miniature tripod legs, while others provide the base only, which can be used on flat surfaces such as tabletops, or attached to tripods.

Some are spring-powered (wind up), some use batteries.
Be sure to read the reviews when shopping, or purchase from a dealer in person so you can test before buying.
Advantages:
- Steady support will enhance straight line shooting and sharpness.
- Some models allow you to select the number of degrees to be included in each shot.
- Many models are very small, much smaller than a full tripod and tripod head.

Disadvantages:
- It’s another thing to carry.
- If it doesn’t include its own legs, you’ll have to use it only when you can find a flat surface to support it safely, or carry a separate tripod.
- Various reviewers report a wide range of product quality, from very good to absolutely terrible (or toy-like). As always, you get what you pay for. Caveat emptor!
- Some of these tools only work on a desk or tabletop. If you want to use the rotating head on a tripod, be sure there are tripod threads on the base of the rotating head before you go to the site you wish to photograph.

Auxiliary Lenses
Multiple options are available for adding wide-angle (and other) lenses to your phone, clipping them over the phone’s lens when you want to use them.
A wide range of manufacturers include German lens giants Schneider and Zeiss, as well as Ollo, CamKix, iPro, Manfrotto, Moment, Ztylus, ExoLens, AGPtek, Olloclip, and Photojojo.
Some are designed just for fun, and some are designed to deliver the best image quality (and are priced accordingly.)
These lenses offer wide-angle perspectives, and some are full fish-eye.
Some manufacturers sell kits that include wide-angle, telephoto and close-up lenses.
Advantages:
- Clipping an auxiliary lens on a phone can be quick and easy.
- One shot can gather a much wider field of view.
- Some of these lenses can be used effectively with the built-in panorama software to capture an even wider panorama.
Disadvantages:
- It’s yet another thing to carry.
- It’s challenging for some people to keep these lenses clean (and unbroken).
- Lenses vary significantly in quality; shop very carefully.
- The lenses don’t work with most case-enclosed phones, or require you to purchase a special case made by the clip-on lens manufacturer.
- The file size is not enlarged, so a print made from a single shot may not be nearly as large as one created with panorama software.
A Surprising Practical Use for Panoramic Photography
Sometimes, you don’t necessarily want to make a very narrow photo in one dimension.
Rather, you need to capture an image with just a bit wider field of view at greater detail then your lens and camera combination can provide in a single shot.
Panorama technology can easily be used to create a bigger image with less dramatic ratios of width to height.
To do this, use the technique shown earlier to create a panorama, but only let the panorama travel a little bit, then stop it.
The image below of the Santa Maria City Hall uses only a fraction of the possible format.
I shot the panorama mode, but made a vertical panorama, using only a little bit of the pano-mode, to capture the top of the building and the magnolia tree.
I corrected for some distortion, which created the gray space shown around the left image, and I then used the Content-Aware Fill tool in Photoshop to fill in the empty area.
Caution: Your mileage may vary with Content-Aware Fill.

You can make the panorama as long or short as you like, capturing only what you need to include.
The technique for doing the same thing using dedicated standalone cameras (as opposed to cameras in phones) requires shooting multiple overlapping images, then combining them in various software later—but that’s a discussion for another article.

Whether shooting with the phone, or individual frames to stitch later in the computer, simply shoot the part that you want.
If you’re using multiple frames to stitch together, be sure to allow enough overlap to make a good stitch later.
The only thing done differently is choosing to capture a much narrower total field of view. Capture the image in your usual fashion.
The result of this will be an image that is as wide and tall as you need it to be, with extra resolution relative to shooting a single frame.
Many photographers who can’t afford high resolution medium or large format cameras use their smaller cameras to shoot overlapping frames to then stitch together, producing files with much more detail and resolution than their cameras can produce in a single frame.
Hasselblad resolution and quality is often desirable but rarely affordable; this technique comes close to providing a total end run around the price, but delivering adequate quality to meet the customers’ needs.
Stitching can be done in both Photoshop and now Lightroom, automatically.
Best Exposure Practices for Phone Panoramas
To capture the image of the City Hall above, I made sure to touch the phone’s screen to set the exposure, tapping on the bright part of the patio to the right of the sculpture, rather than the shadows on the ground.
That tap set the exposure so that the detail was held in the stucco walls, the brightest parts of the scene, without completely blocking up the shadows in the magnolia tree, the darkest part of the image.
Experience has shown me that on this phone, setting exposure in a brighter than middle tone will hold detail in the highlights, which is critical.
I can always open up the shadows while editing later, but if I don’t capture detail in the highlights, I won’t be able to put it in after the fact, as it won’t be there to bring out.

In brightly lit scenes with lots of bright light and dark shadow, such as this one, it’s important to know the camera’s dynamic range.
You learn this by practicing on high contrast scenes until you have a good sense of the best results for shooting.
Using this scene as a good test, I would test a new phone camera by shooting a series of images, readjusting the exposure each time by touching first in the dark trees at top left, then shooting another image after touching the stucco walls to set the exposure for the brightest part of the scene.
Third and fourth exposures would key off the shadows on the patio, and then the bright area.
Finally, I’d make a fifth exposure by keying on the sky.
I’d then bring these test images back into Adobe Bridge or Lightroom, and see which one(s) held detail in all the areas of the frame.
The test image shown doesn’t show the sky when it’s almost pure white, so you may want to shoot more than one test scene.
Using these test images to evaluate, I’ll know exactly where to set the exposure with one touch to hold both detail and shadow, though I might need to use a bit of editing to optimize the image later, as I usually do.

While it would be nice if the HDR setting could be invoked on the phone while creating panoramic images, this feature is not enabled for panoramic shooting on my phone, requiring more care in shooting. Perhaps in future models?
I strongly recommend you test each new camera phone this way.
Investing very little time on creating and evaluating test exposures, you gain great information which helps you make the best-exposed panoramas possible with your particular phone’s camera and its particular dynamic range.
Another Fun Technique: Moving You, Not the Camera
When you trigger the panorama capture on your phone, you normally move the camera in a sweeping motion from one side to the other.
What if you moved instead?

The images above and those below are shot from Caltrain, the commuter rail service which runs between San José and San Francisco.
I triggered the pano mode to start capturing at different points during the run northward, sometimes when the train was slowly pulling out of or entering a station, other times while running full speed.
In each case, I let the camera run the entire length it wanted to shoot, knowing I could crop it later.
In some cases, I started another shot immediately, the instant the preceding capture ended, and combined the images in Photoshop, using the Photomerge tool.

A benefit of this method of shooting panoramas is that the motion of the camera parallel to the image being captured removes the distortion of straight objects so common in many panoramic images.
It’s not something that can be done often, but when possible, it provides an interesting perspective and some great effects.
Various cameras are better than others at capturing images while moving, and if the conveyance hits a bump, you may seem some interesting artifacts in the image, which you can leave in for effect, or edit out if warranted.
One tip for this kind of shooting—be sure to put your camera directly up against the glass, preferably where you won’t be shooting through dirt or dried water marks.
This minimizes reflections and enhances the chance of getting a sharper image. Of course, this doesn’t always work, as shown in the next image.

Sometimes, especially when the train is moving slowly as it pulls in or out of a station, the software may get confused, and you’ll see multiple copies of something.
In the image directly below, you can see the trees behind the storage units are duplicated multiple times, but there really weren’t that many trees behind the units.
You get to decide if this is an artistic effect you want to keep or discard the photo as untrue to reality.

When creating these images, I used a leveling app (iHandy Level Free) on my phone to make sure that I had the phone as perfectly level as possible.
Of course, just because my phone was level doesn’t mean the track was! The next image shows the effects of irregular track-bed, causing the rails to warp in interesting ways.

Three images I shot as the train pulled into its final stop in San Francisco are composited and shown in the next frame.
Of course, the more images I added horizontally, the shorter the image became relative to its width.
Images with this kind of ratio are rarely used at small sizes, because it’s impossible to see much detail.

Closeup photography can be fun to do with a macro lens on your camera, creating panorama-shaped images.
You can simply crop to the ratio if you’ll have an adequate file size, or you can move the camera on a special rail designed to be used with a tripod.
Capture vertical images, overlapping a lot, for best results, and stitch together in Photoshop or Lightroom (latest version needed for Lightroom, as this is a new feature).

Conclusion
Using your phone’s panorama format to create images is both simple to do and challenging to do well.
Practice is essential, but with practice, great images can be created to make great display prints on your wall, using the camera you always have with you—in your phone.


Kevin O’Connor helps design and test software, is a graphic designer and photographer for multiple clients and companies, and fixes people’s (and companies’) color.
He has consulted to multiple companies, including Apple, Sony, Fujifilm USA, and X-Rite. He loves teaching good color practices to enthusiastic learners
