

A look at the HDR Efex Pro™ in Nik Software’s Complete Collection.
Nik Software’s Complete Collection is a set of Photoshop, Lightroom, and Aperture plugins for PC & Mac that allow you to adjust your images in hundreds of creative ways. All plug-ins feature Nik Software’s patented U Point® technology, giving photographers the most powerful tools for precise, natural photographic enhancements and corrections without the need for complicated selections or layer masks.
Note: For each example, we are using RAW file format. With the RAW file format, you will have greater control over editing your images with the Nik Software as there is much less processed data contained in the file. While a JPEG or TIFF file will work, these file types contain processed data in terms of color and light so the end result will be less control over editing your image file.
RAW file format:File that contains minimally processed data from a digital camera. Raw files are processed by a raw converter in a wide-gamut colorspace where precise adjustments can be made before conversion to a file format (such as TIFF or JPEG). These adjustments include color calibration and white balance.
To see how to set the white balance and calibrate RAW files, take a look at our post on Color Accurate Photos from Your Camera.
Nik Software’s Complete Collection consists of 6 components to edit and enhance your images for printing. This week, we’ll take a look at HDR Efex Pro™.
HDR Efex Pro
HDR: High Dynamic Range imaging is a photographic technique that allows a greater contrast of luminance between the lightest and darkest areas of an image. This process commonly involves taking 3 individual shots at 3 separate shutter speeds (High, Normal, and Low speeds). These speeds are typically defined by the photographer depending on the scene being shot and the lighting conditions.
*Each image is combined through an HDR imaging software before being processed to print. Some of the more widely used software include Photomatix, FDR Tools, Dynamic Photo HDR, and many others.
We’ve discussed Printing Guidelines for HDR Photography in a previous post, but in this example I’ll show you how to obtain a great HDR print on our Vibrance Rag High Gloss Fine Art Paper using just one photo:
1. Open your RAW file in Photoshop. This will launch the Adobe Camera Raw PlugIn. If you do not have Camera Raw installed (or need to update it), it can be downloaded HERE. Click on Open Image.

2. The image will open in Photoshop, and on the right hand side you’ll see the Nik Software panel. Click on HDR Efex Pro, Tone Mapping (Single Image). This will launch the HDR Efex Pro window.

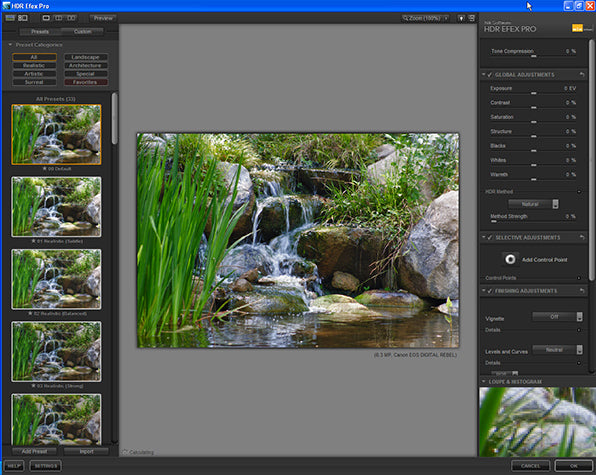
3. On the left hand side, you’ll see 33 different presets for HDR. Each preset is customizable, so we’ll use the number 10 preset: Vibrant Details & Colors as our starting point.

4. After your preset is selected, you’ll see a list of different adjustments on the right hand side of the window. You’ll notice that each preset has pre-determined values for each adjustment slider, which we can customize to better suit the photo. In this particular photo, I want to get more saturation from the blacks. Let’s raise the “Blacks” slider over to -25%

5. Nik software utilizes “Control Points” which allow you to make adjustments to an individual area of the image. For example, I want the plants on the left side of the photo to be a bit less saturated. Click on “Add Control Point” and then click on the plants to place the Control Point.

6. When the Control Point has been placed, you’ll notice 3 adjustment sliders below the Control Point. Let’s adjust the Saturation slider (3rd from the top) to -60%.

7. Let’s expand the effect of this Control Point by expanding the radius of the Control Point. Notice how this only affects the plant and not any surrounding areas. The radius of the Control Point intelligently seeks similar pixel values so only the necessary colors are affected.

8. Let’s make some adjustments to the rock in the center of the image. After setting a Control Point there, let’s adjust the Contrast to 80%. After that, click on the arrow under the sliders to expand the adjustments. The last adjustment is for the Whites, so we’ll set that to 74%. With these adjustments, we can edit any part of the image to bring it out further in the print.


9. I want to apply the same adjustments to the area above the rock. While holding the ALT key, click on the Control Point that was just created and drag it to the new desired spot. This is an easy way to duplicate settings on multiple areas of your image since we’re copying the adjustments with the Control Point.

10. When you have finished making all of your adjustments, click on the “Split Preview” button in the top left section of the window. A Red Guide will appear in the middle of the screen allowing you to see your image before the adjustments and after (this guide can be dragged to any part of the image).

When you have completed your adjustments, click OK and the software will save the image. We printed this image with these adjustments on Vibrance Rag, which really highlighted the areas that were adjusted. And with the simple process above you can be well on your way to achieving great HDR prints without the need for multiple exposures.
Here is a Before and After print comparison:


Any questions or comments? Leave them below.
- Photography Kit Essentials: Core Kit and Emergency Items [1/3]
- 7 Alternative Media Types to Sell More Portrait Photography
- Take Perfect Panoramas With Your Phone (Iphone and Android)
- Interview: Keith Cooper on Starting a Career in Commercial Photography
- Photoshop Basics: Working With Layers Tutorial
- Popular Tools in Photoshop: Pen Tool
